Showing posts with label Selenium. Show all posts

Sunday, October 9, 2016

Data Driven Testing with TestNG framework using Apache POI (Excel)

Data Driven Testing using Excel in TestNG

Quite simply put, data-driven testing is when you store test data (input, expected output, etc) in some external storage (database, spreadsheet, xml-files, etc) and then use that data iteratively in your tests when running them.

 We will use Apache Poi(Excel) to drive data from Excel spreadsheet.
Apache POI (Excel) and TestNG Data Providers to accomplish this in TestNG Framework. Let's get started.

Step 1: Create a test case of Login Application with TestNG Data Provider.
Step 2:  Create a Test Data sheet.
Step 3: Create functions to Open & Read data from Excel
Step 4: Create a TestNg test case for accepting data from Excel using Data Provider.
Step 5: Run the test against the Test Case name in the Test Data file.

I am going to use same class from previous post, 'DataProvider' class code and the code from previous post is below --

package automationFramework;

import java.util.concurrent.TimeUnit;

import org.openqa.selenium.By;
import org.openqa.selenium.WebDriver;
import org.openqa.selenium.WebElement;
import org.openqa.selenium.safari.SafariDriver;
import org.testng.Assert;
import org.testng.annotations.DataProvider;
import org.testng.annotations.Test;

public class DataProviderTest {
    public static WebDriver sDriver = new SafariDriver();
   
  @DataProvider(name= "LoginValidation")
  public static Object[][] credentials() {
 return new Object[][] { { "user1", "pass1" }, { "user2", "pass2" }};

}
  @Test(dataProvider="LoginValidation")
  public void testOne(String sUsername,String sPassword ) throws InterruptedException {
      sDriver.manage().timeouts().implicitlyWait(10, TimeUnit.SECONDS);
      //Open website
      sDriver.get("http://amazon.com");
      //Verify Page title
      WebElement myAccountLink = sDriver.findElement(By.id("nav-link-yourAccount"));
     
      //Adding assertion check here. Test will only continue if below statement is True.
      Assert.assertTrue(myAccountLink.isDisplayed());
      //My Account Link will be clicked only if the above condition is true
      myAccountLink.click();
     
      Thread.sleep(1000);
      sDriver.findElement(By.xpath(".//*[@id='ap_email']")).sendKeys(sUsername);
      sDriver.findElement(By.xpath(".//*[@id='ap_password']")).sendKeys(sPassword);
      sDriver.findElement(By.xpath(".//*[@id='signInSubmit']")).click();
  }
}


Next, Create excel spreadsheet with test data.. I created below spreadsheet -

Next, Setup Apache POI library, which allows you to read, create and edit MS Office documents using Java. Follow below steps to install, setup and implement POI Libraries.

1. Download POI libraries here - https://poi.apache.org/download.html


Add all the Jar files to Eclipse Project. 


2. Next , Create a New Package file in the Project and name it as ‘testData’, by right click on the Project and select New > Package
Place all of your test data in this folder (package) whether it is a sql file, excel file or anything meaning, save your testData file into this Package location
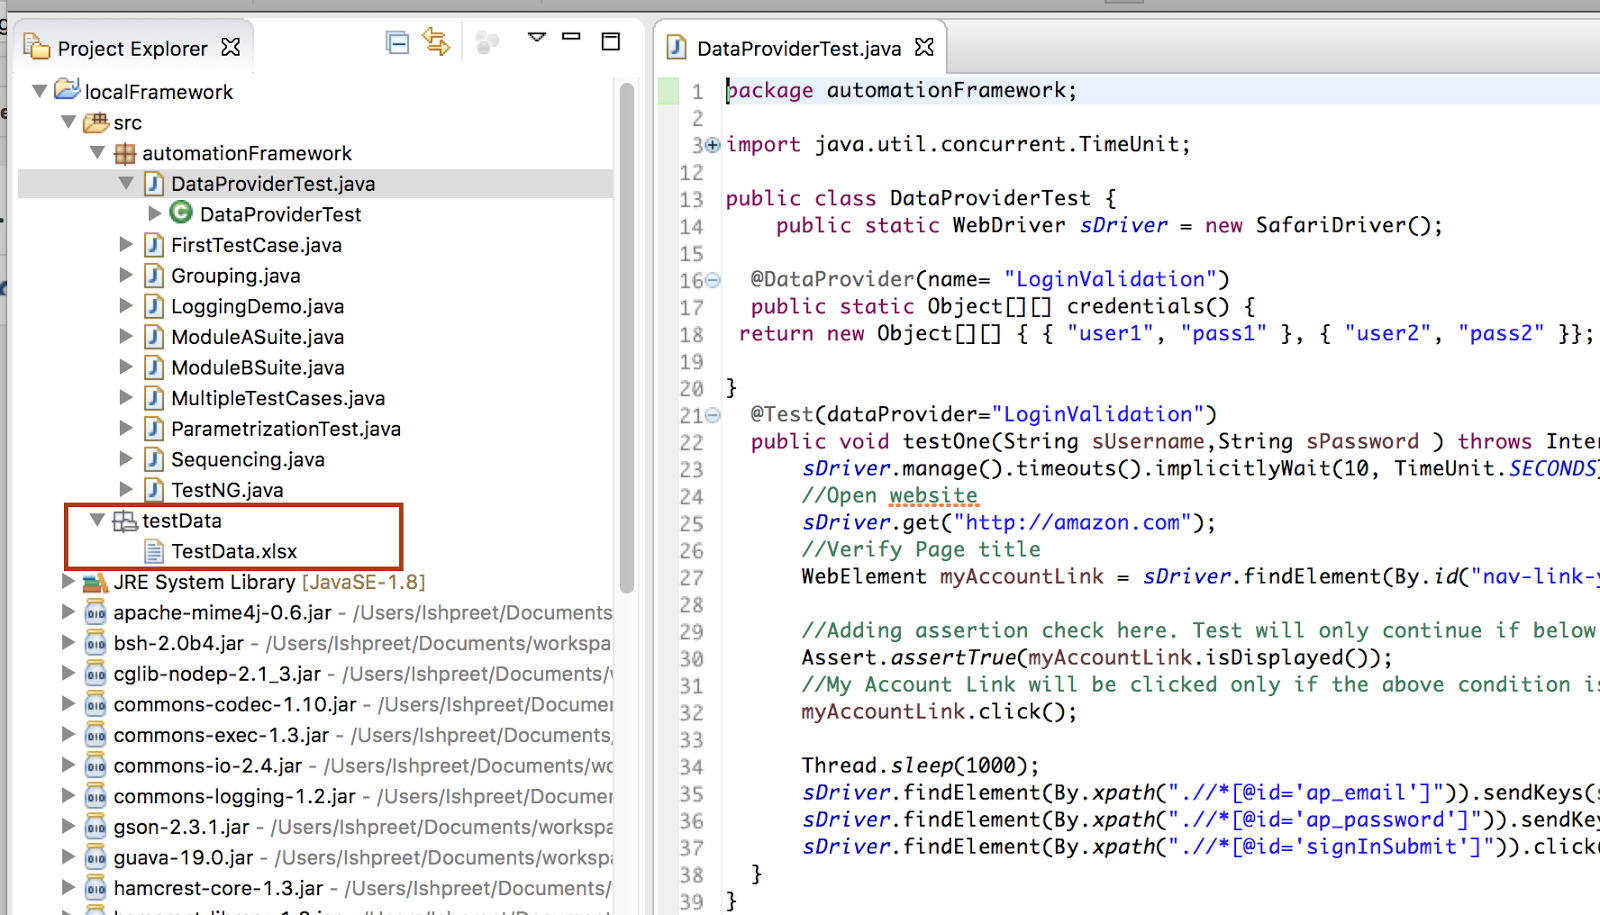


3. Create new Package called 'utility' and inside the package create a new Constant Class 'Constant' and store the value of testData package path & Excel file name


Create a new Class in Utility package and ‘ExcelUtils‘ that include basic read/write methods. Copy and paste below read/write basic excel reader code.

 The folder so far should look like this - 

Now that XLS reader is ready. Let's modify the DataProviderTest class  to accept the test data from excel file.

4. Create a TestNg test case and under Annotations, check ‘@BeforeMethod‘, ‘@AfterMethod‘ & ‘DataProvider‘ and click Finish. By default it will looks like this.. We need to modify it now.

Add a method Login_data() to your Test class. This method takes two strings as input parameters.
Next, Divide the test cases into 3 parts -
@BeforeMethod : Launch Firefox and direct it to the Base URL
@Test : Enter Username & Password to Login, Print console message and Log out
@AfterMethod : Close Firefox browser
Test Case will look like this:

package utility;
import java.io.FileInputStream;
        import java.io.FileNotFoundException;
        import java.io.FileOutputStream;
        import java.io.IOException;
        import org.apache.poi.xssf.usermodel.XSSFCell;
        import org.apache.poi.xssf.usermodel.XSSFRow;
        import org.apache.poi.xssf.usermodel.XSSFSheet;
        import org.apache.poi.xssf.usermodel.XSSFWorkbook;
    public class ExcelUtils {
            private static XSSFSheet ExcelWSheet;
            private static XSSFWorkbook ExcelWBook;
            private static XSSFCell Cell;
            private static XSSFRow Row;
        //This method is to set the File path and to open the Excel file, Pass Excel Path and Sheetname as Arguments to this method
        public static void setExcelFile(String Path,String SheetName) throws Exception {
               try {
                    // Open the Excel file
                    FileInputStream ExcelFile = new FileInputStream(Path);
                    // Access the required test data sheet
                    ExcelWBook = new XSSFWorkbook(ExcelFile);
                    ExcelWSheet = ExcelWBook.getSheet(SheetName);
                    } catch (Exception e){
                        throw (e);
                    }
            }
        public static Object[][] getTableArray(String FilePath, String SheetName, int iTestCaseRow)    throws Exception
        { 
           String[][] tabArray = null;
           try{
               FileInputStream ExcelFile = new FileInputStream(FilePath);
               // Access the required test data sheet
               ExcelWBook = new XSSFWorkbook(ExcelFile);
               ExcelWSheet = ExcelWBook.getSheet(SheetName);
               int startCol = 1;
               int ci=0,cj=0;
               int totalRows = 1;
               int totalCols = 2;
               tabArray=new String[totalRows][totalCols];
                   for (int j=startCol;j<=totalCols;j++, cj++)
                   {
                       tabArray[ci][cj]=getCellData(iTestCaseRow,j);
                       System.out.println(tabArray[ci][cj]);
                   }
            }
            catch (FileNotFoundException e)
            {
                System.out.println("Could not read the Excel sheet");
                e.printStackTrace();
            }
            catch (IOException e)
            {
                System.out.println("Could not read the Excel sheet");
                e.printStackTrace();
            }
            return(tabArray);
        }
        //This method is to read the test data from the Excel cell, in this we are passing parameters as Row num and Col num
        public static String getCellData(int RowNum, int ColNum) throws Exception{
           try{
              Cell = ExcelWSheet.getRow(RowNum).getCell(ColNum);
              String CellData = Cell.getStringCellValue();
              return CellData;
              }catch (Exception e){
                return"";
                }
            }
        public static String getTestCaseName(String sTestCase)throws Exception{
            String value = sTestCase;
            try{
                int posi = value.indexOf("@");
                value = value.substring(0, posi);
                posi = value.lastIndexOf(".");  
                value = value.substring(posi + 1);
                return value;
                    }catch (Exception e){
                throw (e);
                        }
            }
        public static int getRowContains(String sTestCaseName, int colNum) throws Exception{
            int i;
            try {
                int rowCount = ExcelUtils.getRowUsed();
                for ( i=0 ; i<rowCount; i++){
                    if  (ExcelUtils.getCellData(i,colNum).equalsIgnoreCase(sTestCaseName)){
                        break;
                    }
                }
                return i;
                    }catch (Exception e){
                throw(e);
                }
            }
        public static int getRowUsed() throws Exception {
                try{
                    int RowCount = ExcelWSheet.getLastRowNum();
                    return RowCount;
                }catch (Exception e){
                    System.out.println(e.getMessage());
                    throw (e);
                }
            }
}


Now Update DataProviderWithExcel class

package automationFramework;
import org.testng.annotations.Test;
import utility.ExcelUtils;
import org.testng.annotations.BeforeMethod;
import java.util.concurrent.TimeUnit;

import org.openqa.selenium.By;
import org.openqa.selenium.WebDriver;
import org.openqa.selenium.WebElement;
import org.openqa.selenium.safari.SafariDriver;
import org.testng.Assert;
import org.testng.annotations.AfterMethod;
import org.testng.annotations.DataProvider;

public class DataProviderWithExcel {
WebDriver sDriver;
private String sTestCaseName;
private int iTestCaseRow;
@BeforeMethod
public void beforeMethod() {
 sDriver = new SafariDriver();
 sDriver.manage().timeouts().implicitlyWait(10, TimeUnit.SECONDS);
 //Open website
 sDriver.get("http://amazon.com");
 }
 
  @Test(dataProvider = "LoginValidation")
  public void credentials(String sUsername, String sPassword) throws  Exception{
 
 //Verify Page title
 WebElement myAccountLink = sDriver.findElement(By.id("nav-link-yourAccount"));
 
 //Adding assertion check here. Test will only continue if below statement is True.
 Assert.assertTrue(myAccountLink.isDisplayed());
 //My Account Link will be clicked only if the above condition is true
 myAccountLink.click();
 System.out.println("My Account is clicked");
 Thread.sleep(1000);
 sDriver.findElement(By.xpath(".//*[@id='ap_email']")).sendKeys(sUsername);
 System.out.println("UserName is: " + sUsername);
 sDriver.findElement(By.xpath(".//*[@id='ap_password']")).sendKeys(sPassword);
 System.out.println("Password is: " +sPassword);
 sDriver.findElement(By.xpath(".//*[@id='signInSubmit']")).click();  
  }
  @AfterMethod
  public void afterMethod() {
 sDriver.close();
  }
  @DataProvider
  public Object[][] LoginValidation() throws Exception{
 
   // Setting up the Test Data Excel file
ExcelUtils.setExcelFile("//Users//User//Documents//workspace//Java//localFramework//src//testData//TestData.xlsx","Sheet1");
sTestCaseName = this.toString();
  // From above method we get long test case name including package and class name etc.
  // The below method will refine your test case name, exactly the name use have used
  sTestCaseName = ExcelUtils.getTestCaseName(this.toString());
   // Fetching the Test Case row number from the Test Data Sheet
   // Getting the Test Case name to get the TestCase row from the Test Data Excel sheet
iTestCaseRow = ExcelUtils.getRowContains(sTestCaseName,0);

   Object[][] testObjArray = ExcelUtils.getTableArray("//Users//User//Documents//workspace//Java//localFramework//src//testData//TestData.xlsx","Sheet1",iTestCaseRow);
    return (testObjArray);

}
}

Wednesday, October 5, 2016

Parameterization in TestNG and TestNG DataProviders

TestNG Parameters

There are times when we would like to run our tests against different data sets. Instead of hard coding the data set within tests itself, it will be more appropriate if we could pass our data as parameters to the test method. Thus the test logic remains same but the data on which the test is run changes and this is called data-driven testing.
One of the most important features of TestNG is its data-driven testing. It allows the user to pass parameter values to the test method as arguments, so the test ends up running for each data-set passed in.
TestNG supports two different ways of injecting parameter values.
  1. Parameterization through testng.xml
  2. DataProvider

In most cases, you'll come across a scenario where the business logic requires a hugely varying number of tests. Parameterized tests allow developers to run the same test over and over again using different values.

Passing Parameters with testng.xml 
With this technique, you define the simple parameters in the testng.xml file and then reference those parameters in the source files. Let us have an example to demonstrate how to use this technique to pass parameters.

I am going to create new TestNG class 'ParametrizationTest', Open Amazon site and try logging in by passing username and password as parameters.

Add the annotation @Parameters("myName") to this method. The parameter would be passed a value from testng.xml

package automationFramework;
import org.testng.annotations.Parameters;
import java.util.concurrent.TimeUnit;
import org.openqa.selenium.By;
import org.openqa.selenium.WebDriver;
import org.openqa.selenium.WebElement;
import org.openqa.selenium.safari.SafariDriver;
import org.testng.Assert;
import org.testng.annotations.Test;

public class ParametrizationTest {
    public static WebDriver sDriver = new SafariDriver();
  @Test
  @Parameters({"sUsername","sPassword"})
  public void testOne(String sUsername, String sPassword) throws InterruptedException {
      sDriver.manage().timeouts().implicitlyWait(10, TimeUnit.SECONDS);
      //Open website
      sDriver.get("http://amazon.com");
      //Verify Page title
      WebElement myAccountLink = sDriver.findElement(By.id("nav-link-yourAccount"));
     
      //Adding assertion check here. Test will only continue if below statement is True.
      Assert.assertTrue(myAccountLink.isDisplayed());
      //My Account Link will be clicked only if the above condition is true
      myAccountLink.click();
     
      Thread.sleep(1000);
      sDriver.findElement(By.xpath(".//*[@id='ap_email']")).sendKeys(sUsername);
      sDriver.findElement(By.xpath(".//*[@id='ap_password']")).sendKeys(sPassword);
      sDriver.findElement(By.xpath(".//*[@id='signInSubmit']")).click();
     
  }
}


Next, Pass the Parameters in testng.xml and run it. The output will look like this-


TestNG DataProviders

Passing Parameters with Dataproviders

When you need to pass complex parameters or parameters that need to be created from Java (complex objects, objects read from a property file or a database, etc.), parameters can be passed using Data providers. A Data Provider is a method annotated with @DataProvider. This annotation has only one string attribute: its name. If the name is not supplied, the data provider’s name automatically defaults to the method’s name. A data provider returns an array of objects.
The following examples demonstrate how to use data providers.

 Let's start by creating a new TestNG class 'DataProviderTest'

1)  Define the method logons() which is defined as a Dataprovider using the annotation. This method returns array of object array.

2) Add a method test() to your DataProviderTest class. This method takes two strings as input parameters.

3) Add the annotation @Test(dataProvider = “LoginValidation”) to this method. The attribute dataProvider is mapped to “LoginValidation”.

package automationFramework;

import java.util.concurrent.TimeUnit;

import org.openqa.selenium.By;
import org.openqa.selenium.WebDriver;
import org.openqa.selenium.WebElement;
import org.openqa.selenium.safari.SafariDriver;
import org.testng.Assert;
import org.testng.annotations.DataProvider;
import org.testng.annotations.Test;

public class DataProviderTest {
    public static WebDriver sDriver = new SafariDriver();
   
  @DataProvider(name= "LoginValidation")
  public static Object[][] credentials() {
 return new Object[][] { { "user1", "pass1" }, { "user2", "pass2" }};

}
  @Test(dataProvider="LoginValidation")
  public void testOne(String sUsername,String sPassword ) throws InterruptedException {
      sDriver.manage().timeouts().implicitlyWait(10, TimeUnit.SECONDS);
      //Open website
      sDriver.get("http://amazon.com");
      //Verify Page title
      WebElement myAccountLink = sDriver.findElement(By.id("nav-link-yourAccount"));
     
      //Adding assertion check here. Test will only continue if below statement is True.
      Assert.assertTrue(myAccountLink.isDisplayed());
      //My Account Link will be clicked only if the above condition is true
      myAccountLink.click();
     
      Thread.sleep(1000);
      sDriver.findElement(By.xpath(".//*[@id='ap_email']")).sendKeys(sUsername);
      sDriver.findElement(By.xpath(".//*[@id='ap_password']")).sendKeys(sPassword);
      sDriver.findElement(By.xpath(".//*[@id='signInSubmit']")).click(); 
  }
}

 
Run testng.xml file and see the Test Result. The output will look like this and it will show all the parameters - 


TestNG Asserts example and explanation

Assertions in TestNG

Asserts helps us to verify the conditions of the test and decide whether test has failed or passed. A test is considered successful ONLY if it is completed without throwing any exception.

There will be many situations in the test where you just like to check the presence of an element. All you need to do is to put an assert statement on to it to verify its existence.

Here we are verifying if the page title is equal to 'Google' or not. If the page title is not matching with the text / title that we provided, it will fail the test case.

Different Asserts Statements
1) Assert.assertTrue() & Assert.assertFalse()

To explain you what is assertion, lets us look into below code sample.
I am going to create new TestNG class 'AssertTest'.

package automationFramework;

import java.util.concurrent.TimeUnit;
import org.openqa.selenium.By;
import org.openqa.selenium.WebDriver;
import org.openqa.selenium.WebElement;
import org.openqa.selenium.safari.SafariDriver;
import org.testng.Assert;
import org.testng.annotations.Test;

public class AssertTest {
    public static WebDriver sDriver = new SafariDriver();
   
  @Test
  public void testOne() throws InterruptedException {
      sDriver.manage().timeouts().implicitlyWait(10, TimeUnit.SECONDS);
      //Open website
      sDriver.get("http://amazon.com");
      //Verify Page title
      WebElement myAccountLink = sDriver.findElement(By.id("nav-link-yourAccount"));
     
      //Adding assertion check here. Test will only continue if below statement is True.
      Assert.assertTrue(myAccountLink.isDisplayed());
    //My Account Link will be clicked only if the above condition is true
      myAccountLink.click();
     
      Thread.sleep(1000);
  }
}


Let's run the code and verify the output.

 Assert.assertFalse() works opposite of Assert.assertTrue(). It means that if you want your test to continue only if when some certain element is not present on the page. You will use Assert false, so it will fail the test in case of the element present on the page.


Like wise there are many Assertions provided by the TestNG. The below are the few which are used commonly.
assertEqual(String actual,String expected) :- It takes two string arguments and checks whether both are equal, if not it will fail the test.

assertEqual(String actual,String expected, String message) :- It takes three string arguments and checks whether both are equal, if not it will fail the test and throws the message which we provide.
assertEquals(boolean actual,boolean expected) :- It takes two boolean arguments and checks whether both are equal, if not it will fail the test.

assertEquals(java.util.Collection actual, java.util.Collection expected, java.lang.String message) :- Takes two collection objects and verifies both collections contain the same elements and with the same order. if not it will fail the test with the given message.

Assert.assertTrue(condition) :- It takes one boolean arguments and checks that a condition is true, If it isn't, an AssertionError is thrown.

Assert.assertTrue(condition, message) :- It takes one boolean argument and String message. It Asserts that a condition is true. If it isn't, an AssertionError, with the given message, is thrown.

Assert.assertFalse(condition) :- It takes one boolean arguments and checks that a condition is false, If it isn't, an AssertionError is thrown.

Assert.assertFalse(condition, message) :- It takes one boolean argument and String message. It Asserts that a condition is false. If it isn't, an AssertionError, with the given message, is thrown.

Tuesday, October 4, 2016

Setup Selenium Java Project in Eclipse

Install Eclipse
If you don’t already have Eclipse installed on your system, then go ahead and install latest version of Eclipse from


Click on the Download button and complete the Installation.

After the installation is complete, Open Eclipse. 

Next, Create a new project in Eclipse by going to File -> New -> Project


 Select Java Project. Next, Enter the name of the project


Click Finish

Now that the Java Project is created, Let's import Selenium files. Right click on the project folder from the left navigation of Eclipse and select Properties.


Then select 'Java Build Path' and 'Libraries' tab. This is where all the selenium and lib files are added.

Next, Make sure all the Selenium files are downloaded and ready to upload. If not then download latest Selenium files from the selenium website (http://www.seleniumhq.org/download/)


Go Back to Eclipse and click 'Add External Jars' and navigate to Selenium files folder. Add all the Jar files.
Note - Add all the jar files inside Selenium folder as well as libs folder.


Now that all the Selenium files are added, Eclipse left nav would like this -


Next, Lets write some code to test and make sure selenium works fine. Continue to the next blog here